C:\Users\dongyl16339\Desktop\MavenSampler-github-maven-repo>mvn clean deploy
[INFO] Scanning for projects...
[INFO]
[INFO] ------------------------------------------------------------------------
[INFO] Building Maven Sampler 3.0
[INFO] ------------------------------------------------------------------------
[INFO]
[INFO] --- maven-clean-plugin:2.5:clean (default-clean) @ maven-repo-sampler ---
[INFO] Deleting C:\Users\dongyl16339\Desktop\MavenSampler-github-maven-repo\targ
et
[INFO]
[INFO] --- maven-resources-plugin:2.6:resources (default-resources) @ maven-repo
-sampler ---
[INFO] Using 'UTF-8' encoding to copy filtered resources.
[INFO] skip non existing resourceDirectory C:\Users\dongyl16339\Desktop\MavenSam
pler-github-maven-repo\src\main\resources
[INFO]
[INFO] --- maven-compiler-plugin:3.6.1:compile (default-compile) @ maven-repo-sa
mpler ---
[INFO] Changes detected - recompiling the module!
[INFO] Compiling 1 source file to C:\Users\dongyl16339\Desktop\MavenSampler-gith
ub-maven-repo\target\classes
[INFO]
[INFO] --- maven-resources-plugin:2.6:testResources (default-testResources) @ ma
ven-repo-sampler ---
[INFO] Using 'UTF-8' encoding to copy filtered resources.
[INFO] skip non existing resourceDirectory C:\Users\dongyl16339\Desktop\MavenSam
pler-github-maven-repo\src\test\resources
[INFO]
[INFO] --- maven-compiler-plugin:3.6.1:testCompile (default-testCompile) @ maven
-repo-sampler ---
[INFO] No sources to compile
[INFO]
[INFO] --- maven-surefire-plugin:2.12.4:test (default-test) @ maven-repo-sampler
---
[INFO] No tests to run.
[INFO]
[INFO] --- maven-jar-plugin:2.4:jar (default-jar) @ maven-repo-sampler ---
[INFO] Building jar: C:\Users\dongyl16339\Desktop\MavenSampler-github-maven-repo
\target\maven-repo-sampler-3.0.jar
[INFO]
[INFO] --- maven-install-plugin:2.4:install (default-install) @ maven-repo-sampl
er ---
[INFO] Installing C:\Users\dongyl16339\Desktop\MavenSampler-github-maven-repo\ta
rget\maven-repo-sampler-3.0.jar to D:\dev_repo\repository\com\tunyl\maven-repo-s
ampler\3.0\maven-repo-sampler-3.0.jar
[INFO] Installing C:\Users\dongyl16339\Desktop\MavenSampler-github-maven-repo\po
m.xml to D:\dev_repo\repository\com\tunyl\maven-repo-sampler\3.0\maven-repo-samp
ler-3.0.pom
[INFO]
[INFO] --- maven-deploy-plugin:2.8.2:deploy (default-deploy) @ maven-repo-sample
r ---
[INFO] Using alternate deployment repository repo.stage::default::file://C:\User
s\dongyl16339\Desktop\MavenSampler-github-maven-repo\target/repo-stage
Uploading: file://C:\Users\dongyl16339\Desktop\MavenSampler-github-maven-repo\ta
rget/repo-stage/com/tunyl/maven-repo-sampler/3.0/maven-repo-sampler-3.0.jar
Uploaded: file://C:\Users\dongyl16339\Desktop\MavenSampler-github-maven-repo\tar
get/repo-stage/com/tunyl/maven-repo-sampler/3.0/maven-repo-sampler-3.0.jar (3 KB
at 81.1 KB/sec)
Uploading: file://C:\Users\dongyl16339\Desktop\MavenSampler-github-maven-repo\ta
rget/repo-stage/com/tunyl/maven-repo-sampler/3.0/maven-repo-sampler-3.0.pom
Uploaded: file://C:\Users\dongyl16339\Desktop\MavenSampler-github-maven-repo\tar
get/repo-stage/com/tunyl/maven-repo-sampler/3.0/maven-repo-sampler-3.0.pom (3 KB
at 222.7 KB/sec)
Downloading: file://C:\Users\dongyl16339\Desktop\MavenSampler-github-maven-repo\
target/repo-stage/com/tunyl/maven-repo-sampler/maven-metadata.xml
Uploading: file://C:\Users\dongyl16339\Desktop\MavenSampler-github-maven-repo\ta
rget/repo-stage/com/tunyl/maven-repo-sampler/maven-metadata.xml
Uploaded: file://C:\Users\dongyl16339\Desktop\MavenSampler-github-maven-repo\tar
get/repo-stage/com/tunyl/maven-repo-sampler/maven-metadata.xml (303 B at 21.1 KB
/sec)
[INFO]
[INFO] --- site-maven-plugin:0.12:site (default) @ maven-repo-sampler ---
[INFO] Creating 9 blobs
[INFO] Creating tree with 10 blob entries
[INFO] Creating commit with SHA-1: e2b8c9c481a1e0830bf05559feb72ea650ee7f68
[INFO] Updating reference refs/heads/dependency from 5b8b548bc0ce3fdb11247d8f5b3
a506a2986a64d to e2b8c9c481a1e0830bf05559feb72ea650ee7f68
[INFO] ------------------------------------------------------------------------
[INFO] BUILD SUCCESS
[INFO] ------------------------------------------------------------------------
[INFO] Total time: 42.614 s
[INFO] Finished at: 2018-09-04T15:43:02+08:00
[INFO] Final Memory: 20M/172M
[INFO] ------------------------------------------------------------------------
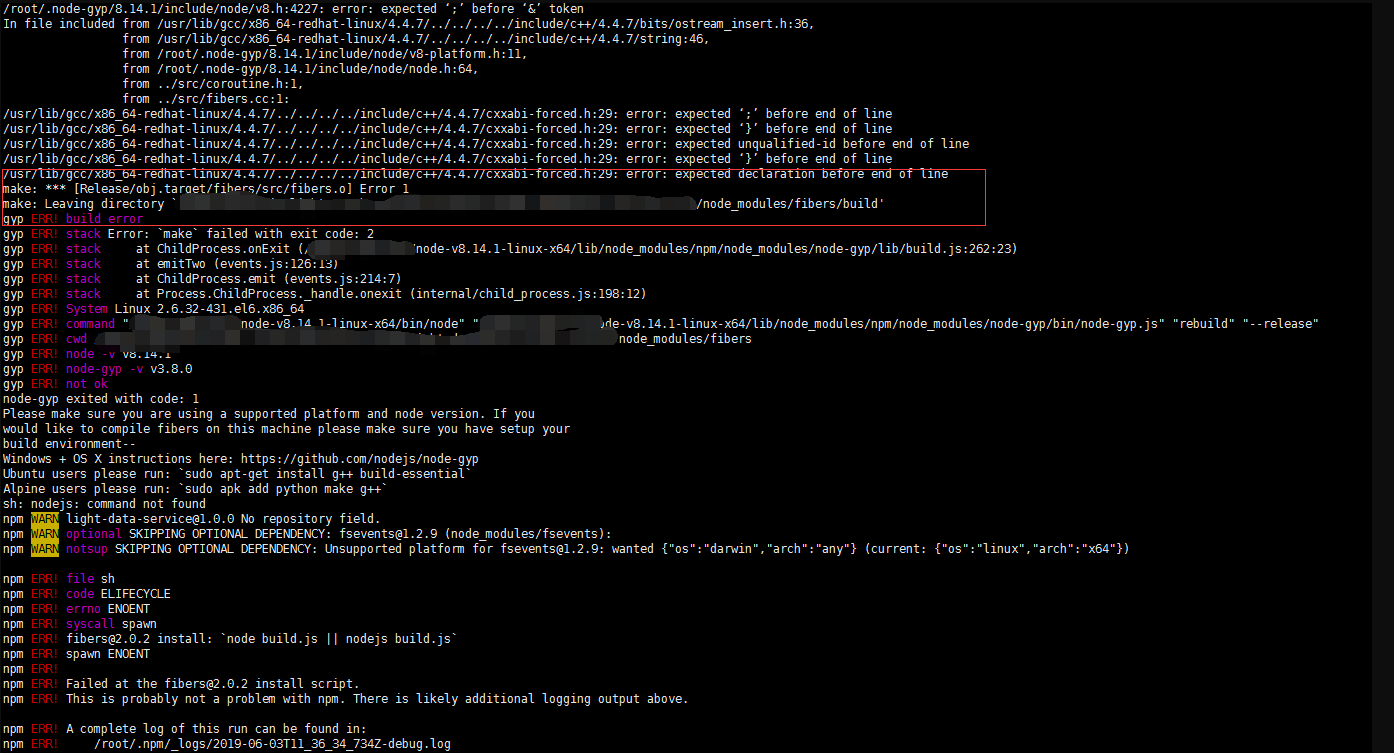
 图片1:异常